Home › Forum › Technical Help › Forum Help & Info › Website Builders / Image Works › Photoshop shapes
- This topic has 16 replies, 3 voices, and was last updated 21 years, 1 month ago by
Graham – Admin.
-
AuthorPosts
-
-
December 23, 2003 at 01:50 #7802
Anonymous
Inactiveif i want to say make a shape cut out with an av what tool do i use in photoshop ie make say a heart shape from a square
-
December 23, 2003 at 02:19 #11450
Graham – Admin
KeymasterPhotoshop 7 uses .csh files (custom shape images)
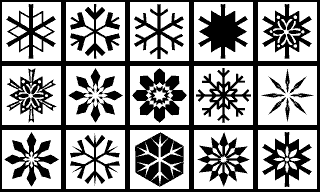
I have 15 snowflake custom shapes.csh for PS6+ if you want em’. Put the .csh in AdobePhotoshop 6.0PresetsCustom Shapes. Then they are available from the custom shape picker.
Preview the 15 patterns
Download the snowflake.cshSearch the net for more custom shapes.
:edit: these will work in PS 7 etc.. -
December 23, 2003 at 05:17 #11451Inactive
I have version 7 and i have downloaded the snowflakes and saved them to the right folder but in photoshop it self where do i find the right tools in the tool bar
-
December 23, 2003 at 05:32 #11452Keymaster
Close and re-open PS 7.
Check the Shapes or Styles palette.
Ton’s of shapes here: http://www.freephotoshop.com/html/free_shapes.html
And speech bubbles here: http://graphicssoft.about.com/library/weekly/aa0801balloons.htm
-
December 23, 2003 at 05:43 #11453Inactive
ok iam not sure what happened but i have just checked and they are in the folder you said to put them in but when i browse to find them while in photoshop they come up as not being in there so what did i do wrong
-
December 23, 2003 at 05:52 #11454Inactive
Just found out why it says they are not compatable with this version of photoshop
-
December 23, 2003 at 05:57 #11455Keymaster
You could try the preset manager.. if no good.
See the Ton’s of shapes link above – they’re free and work with PS 7. -
January 21, 2004 at 06:49 #11456
oncewas
MemberHay thanks for sparking my interest guys, I’m just reading up on PhotoShop 7 , thanks for the links GB, still having a hard time with layers, I may come around, while I’m up at Brisbane and pick your brains GB, lol (so to speak) 8)
-
January 21, 2004 at 09:23 #11457Keymaster
Hey, sure thing oncewas. I’m going past Backstop tomorrow actually.
Click hold and drag layers if you need to re-arange them. The one at the top of the layers pallete is.. well.. ontop. Also click on the eye symbol to hide or show a layer.
-
January 21, 2004 at 22:35 #11458Inactive
I know I for one am having fun may be we should start a workshop, maybe once a month or every second month or whatever lol
-
January 22, 2004 at 07:47 #11459Member
Hey guys , thanks for the tip about drawing a boarder , pretty simple once you have been told how hay ! ! and then just playing around with different styles from the pallet menu, you can make up impressive photo frames ! And yeah I know there are some good actions about to make up photo frames.
-
January 22, 2004 at 10:04 #11460Keymaster
You can record actions and swap them to learn wicked effects. I’m going to throw a challenge at you all soon. Hmmm.. will think something up.
-
January 24, 2004 at 00:03 #11461Inactive
Waiting for the challenge graybags tapping fingers lol
-
January 27, 2004 at 05:43 #11462Inactive
Digital Expance
-
January 27, 2004 at 06:04 #11463Keymaster
That is cool.. so how did you do it?.. step by step please.
-
January 27, 2004 at 06:08 #11464Inactive
Digital Expance
Step 1
Create a new 500×500 px image with a white background.
Select the Polygonal Lasso Tool and make a complex looking
selection. Basically move the mouse around a lot and click the
left mouse button, press enter when you’re done.Step 2
With the same tool in hand make a slightly less complicated
selection while holding down on the ALT key. Fill this new
selection with red, or any colour for that matter.Step 3
Deselect (Select > Deselect) and apply the Motion Blur Filter
(Filter > Blur > Motion Blur) with a zero degree angle and a
distance of about 100.Step 4
Next apply the Extrude Filter (Filter > Stylize > Extrude)
with the following settings: Type, blocks; size, 30; depth,
30 & random. Leave the other boxes unchecked. Repeat (control + F)
this filter four or so times. Duplicate (Layer > Duplicate Layer)
the layer where your image is and Desaturate it
(Image > Adjustments > Desaturate). Use the Glowing Edges Filter
(Filter > Stylize > Glowing Edges) with edge width at 1, edge
brightness at 20, and smoothness at 1. And lastly, set this layer’s
blending option to overlay. This works on a whole wack
(even a jesus-load) of other things, so be sure to experiment
around with this technique in mind!thankyou 2Beers
hows that for a step by step explanation
-
January 27, 2004 at 06:15 #11465Keymaster
Good.. but if you ripped that off a website you should include the source http: to excise copyright law.
I love this effect. http://www.purephotoshop.com/article/80 great for making buttons etc. That can be you’re challenge for now.
-
-
AuthorPosts
- You must be logged in to reply to this topic.
Recent Comments